DIY To Try: Desert Oasis Painted Pumpkins
of all the seasons to decorate for, I have to say that fall is by far my favorite. there’s something magical about the crisp air, the autumn colors, and though it sometimes pains me to admit it, even the #PSLs.
as someone who has always pinned pic after pic of fall front porch decorations and painted pumpkins, (see our roundup of favorite pumpkin decor ideas here) I knew I had to DIY my own take on minimalist halloween decor this year.
I’m not one to go too crazy in the fake leaves and scarecrow department, so I wanted to find something that still felt like it fit with our sunny and 75 LA weather this October. The perfect solution? Pumpkins painted to look like a desert oasis!


this DIY was really really easy and honestly pretty quick. I decided to use fake pumpkins so that they would last longer, but you could easily use real ones too!
this was the first time I’ve ever really decorated our house for fall, and now I’m totally hooked on the seasonal decor thing.
I used to kind of cringe at some of the pics of living rooms on Pinterest that look like craft store explosions, because it’s just not my style. but I realized that the key is just to figure out how to make it something that works with your style and decor, and it’s totally doable.

Here is the step by step process to create these DIY Desert Oasis Painted Pumpkins:
DIY Desert Oasis Painted Pumpkins
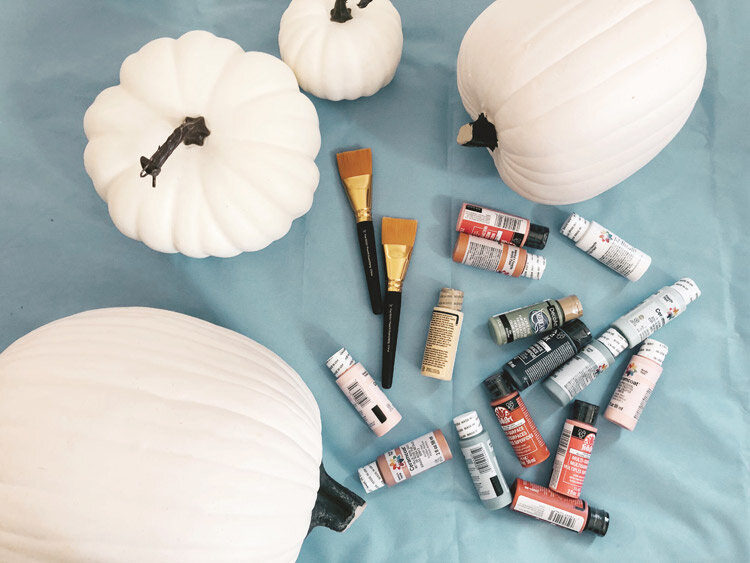
Supplies
3 or 4 pumpkins, real or fake (I used these from JoAnn - last I checked they’re on major sale!)
assorted acrylic paints in whatever color palette you want - colors I used are listed below
1 big paintbrush
1 small paintbrush
palette or palette paper
drop cloth/old towel to work on top of
small fan to dry paint faster (if desired)
paint colors I used:
folk art in autumn leaves, delta in magnolia white, delta in sea foam, delta in calypso coral, folk art in indigo night, delta in terra cotta, folk art in buttercup, delta in waterfall
Instructions:
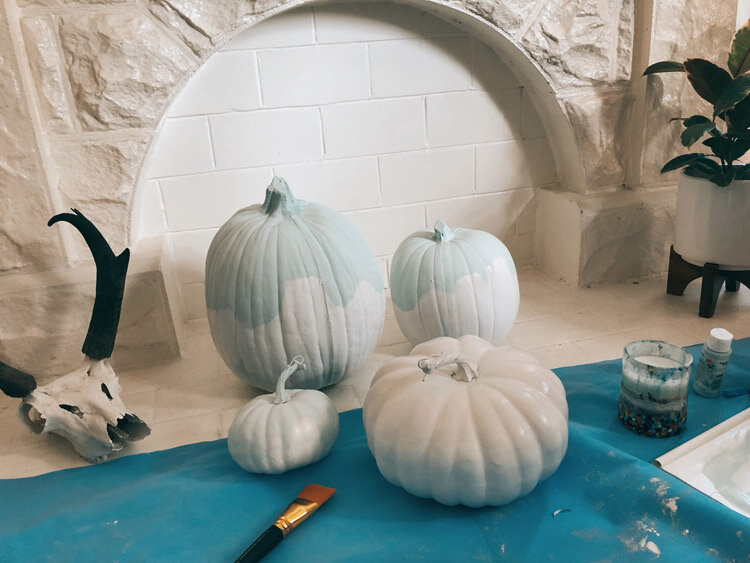
completely coat all of the pumpkins in your ‘sky’ color (i used delta sea foam + magnolia white to get my light blue), let dry. use a small fan and rotate the pumpkins periodically to make it go faster if you want
once dry, decide how you want your pumpkins to be arranged, and get a rough idea of the placement you want. this will help you decide how to configure your ‘landscape.’ to remember which part of the pumpkin should be in the front, place a small dot in a contrasting color (i used light pink) on the bottom center of each stem.
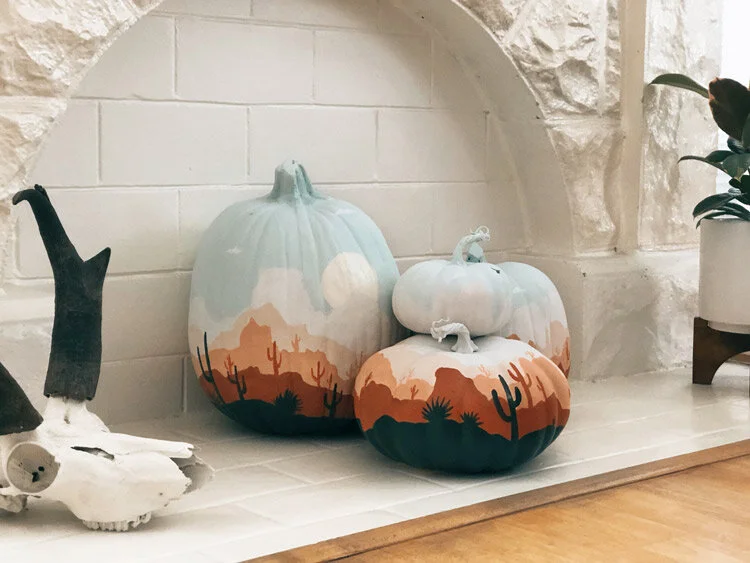
mix up your lightest color for your first layer of ‘canyons’ for the landscape (i used delta calypso coral + magnolia white), and, with your pumpkins back in their ‘arrangement,’ roughly paint in your first layer of rocks/canyons. the easiest way for me to do this was just to squiggle out a line on each pumpkin and then fill in the bottoms afterward. remember, it’s nature and it does NOT have to be perfect! let dry.
mix up a color that’s a few shades darker for your second layer of ‘canyons’ (i used delta calypso coral + a little waterfall to dull the color a bit), and rough in another layer of rocks. try to vary the shapes a bit and don’t be afraid to have fun with it! add in a couple small cacti randomly on top of these ‘rocks,’ fill in the rest of the bottom, and let dry.
mix up another, darker color (this will be your last one before the super dark/black color) and rough in another layer of rocks (i used folk art terracotta + autumn leaves + a little buttercup). add a few staggered cacti on the top of this layer (i made mine a little bigger on this layer since it’s ‘closer’ to the foreground), fill in the bottom and let dry.
now for your last layer! mix up a super dark color (i never like to use full on black, so i used folk art indigo night for this layer) and create the ‘ground.’ I made this one a lot less ‘hilly’ than the other layers, and added in some large cacti and shorter agave type plants. fill in the bottom (you don’t have to paint the very bottom that no one will see if you don’t want) and let dry.
if you want, mix up a super light yellow and add a big sun behind the first layer of rocks. i also used the dark color to add a bird in the sky. that’s it!


I love this DIY so much because it’s super simple and I made these in one afternoon. I also really love being able to feel festive for fall but still have something that works with our decor! it’s kind of like halloween went to coachella?? or something? not really sure but I like it!
what are your favorite ways to decorate for fall and halloween??
