How To Stencil a Faux Tile Concrete Patio
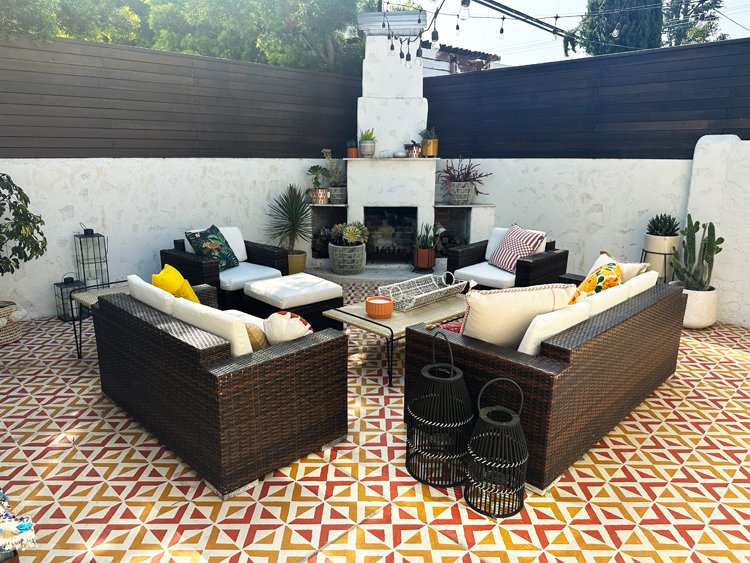
After working on this project for the past year and a half, I’m so excited to finally share my DIY stenciled faux tile concrete patio with you all today!
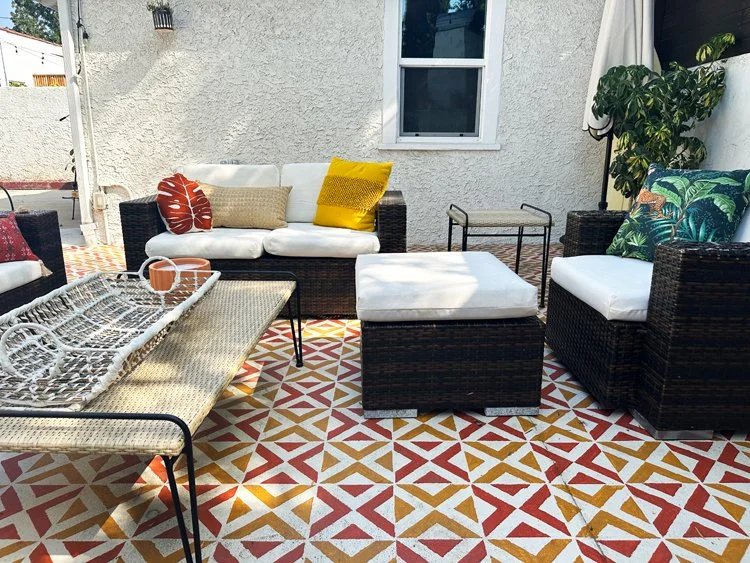
This back patio makeover took a lot longer than most of my recent projects, but the faux tile stencil process, thought time consuming, was surprisingly easy. Read on to learn how to stencil a faux tile concrete patio!
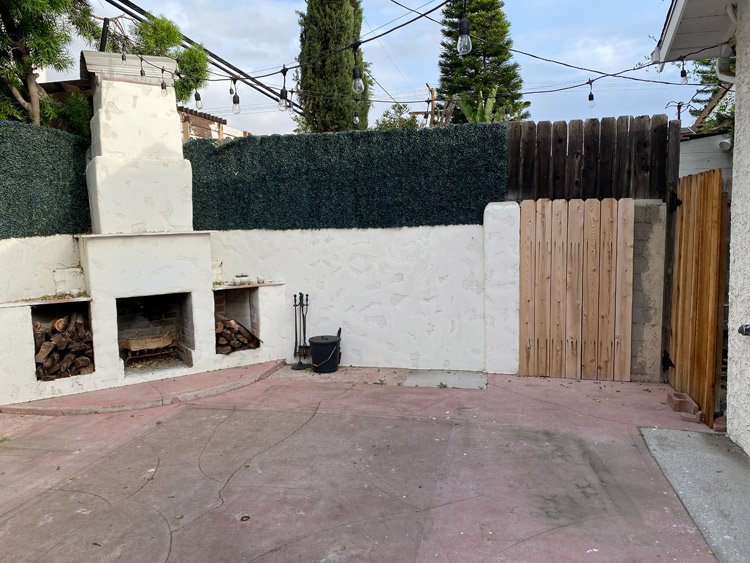
If you’ve watched our stories on Instagram, you’ve probably seen me cataloguing this process over the course of the past year. This space was a huge selling point for us when we bought the house, because we spend so much time outside in Southern California, but the state it was in when we bought the house was drab and very tired. The pink concrete was olllllld and so ugly.
Here’s what it looked like before the makeover:

When we first bought the house, my initial plan was to put some pretty patterned cement tiles over the ugly old pink concrete. However, there were a couple of pretty serious issues with it that made tiling directly over the existing concrete impossible.
Not only were there were no drains for water or rain in the entire space, but the way the concrete sloped also caused rainwater to sit up against the back of our house in a way that would be really bad for the foundation.
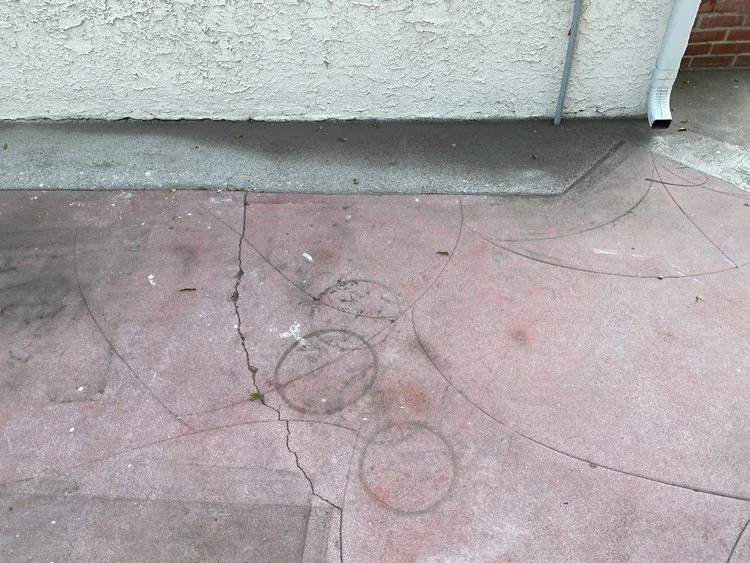
The concrete needed to be totally jackhammered up and relaid, which ended up eating into the budget pretty significantly. That’s when I got the idea to DIY stencil the patio concrete to look like cement tiles.

Once our contractors removed the old stuff, installed a few drains to handle water issues, and relaid the concrete so it would slope water slightly toward the drains, we also replaced the rotting wood fence covered in horribly ugly fake foliage with a new redwood fence.


I ordered a couple of stencils and bought some paint samples to see if this crazy idea was something I even wanted to take on. I knew it would take a lot of time and energy, and I was also VERY afraid of ruining a brand new concrete patio.
After photoshopping a few designs into a pic of the patio and trying several different stencil sizes, I finally settled on a pattern I loved. I found mine from an Etsy shop called Dizzy Duck Stencils, and was also inspired by Dabito’s similar pattern and project.

I tested out several different off-white paint colors to find one that matched our existing stucco walls and fireplace, and ended up going with an ivory color from Behr Porch and Patio Paint called Roman Plaster. I settled on two colors for the stencil pattern - a terracotta red called Kalahari Sunset and a mustard-y yellow called Blonde Wood.

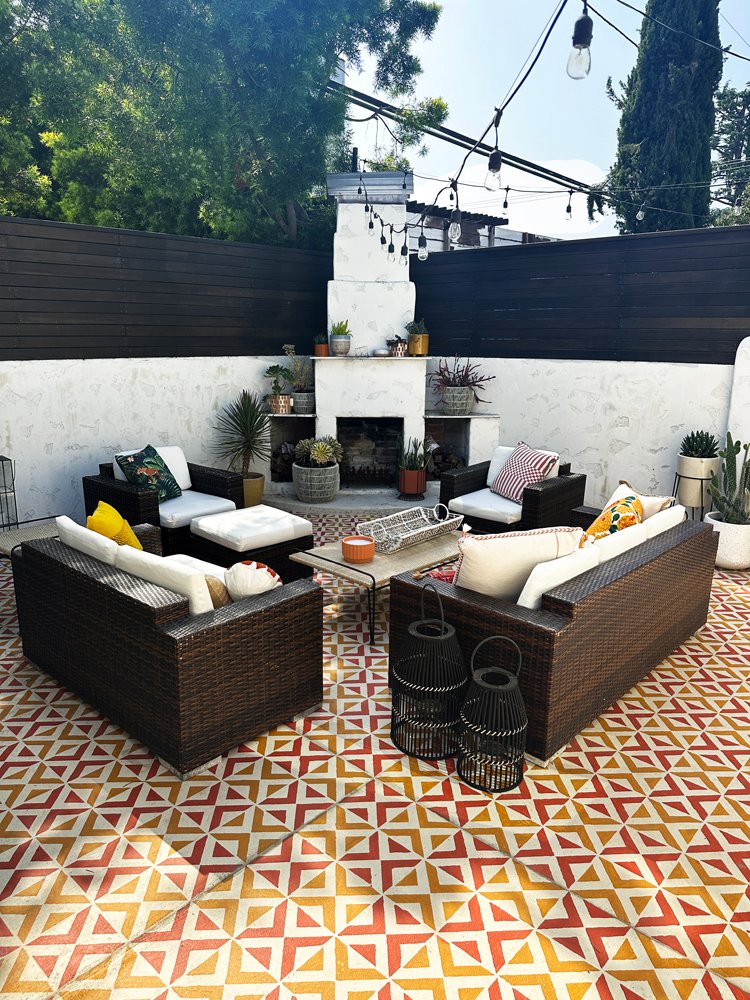
I’m not gonna lie - this was a very time consuming project. BUT ultimately it was beyond worth it and i’m so happy with the results. We truly saved thousands of dollars by going the stencil route instead of installing expensive cement tiles, which I’ve also heard are very difficult to maintain and care for.
After the super rainy and windy winter that we had here in LA, I cannot imagine what kind of beating those fragile cement tiles would have taken, and have never been happier that I took the risk and decided to try this DIY (which has thankfully turned out to be really durable).
Here’s what you’ll need to take on a similar project:

How To Stencil a Faux Tile Concrete Patio
Supplies:
stiff bristle push broom to scrub concrete
spray hose or pressure washer and concrete cleaner (if desired)
paint roller, extender pole, and rough surface paint roller covers
mini paint trays for stencil colors
base coat color and stencil color(s) - I used Behr Porch & Patio Paint
stencil (I recommend getting at least 4) - here’s a link to the one I used
stencil brushes (I found these to work best)
painter’s tape to tape down the stencil
optional. - a patio umbrella ideally with a rolling base (saved me from getting major sunburn)
Instructions:
Choose your stencil pattern and paint colors. I ended up going a geometric design from an Etsy seller called Dizzy Duck Stencils, whose shop offers a ton of cool designs in a bunch of different sizes. Another great thing they offer are these sheets with more than one ‘tile’ on them, and I ended up ordering four sheets so I could get more done at once. (I recommend getting at least four stencils so you can work in pairs)
The type of paint I used was Behr Porch and Patio paint, and after testing out a few samples to see which ivory color matched best, I went with Roman Plaster for the ivory base coat, and then Blonde Wood and Kalahari Sunset for the ‘tiles.’ I just went to Home Depot and had the guy mix those colors into the porch and patio floor paint, which you can have mixed to match any of the colors that Behr offers.
Test out the stencil pattern and colors so you get a feel for how they’re going to look on the concrete. I just used a big piece of cardboard to test out the stencil and get a feel for which brush worked best (I found this edger brush to work best by far - I would just dip the edges into the paint tray and kind of ‘tap’ or dab the paint into the stencil at an angle). Once you’re happy with everything you can start prepping.
Scrub the concrete with a spray hose (or pressure washer if it’s especially dirty or you wanna be super thorough), concrete cleaner diluted with water (which I didn’t use since ours was brand new but probably wouldn’t hurt in most cases) and a stiff bristle push broom. Then let everything dry completely.
Use a leaf blower or something similar to remove as much dirt and debris as possible, then paint your first base coat using the extender pole for your paint roller.
After letting the first coat dry completely, paint a second base coat if desired. Let dry completely.
Now you’re ready to start stenciling! I used painter’s tape to secure the stencil each time, which worked well and won’t pull up any of the base coat paint if you make sure to let it dry completely first.
My recommendation here is to find a great audiobook or podcast, because this is obviously the most time consuming part. Another tip I’d give here is that these projects are much more about the whole thing rather than the small details, so don’t worry if you have splotchy stencils here and there or mess up a little. I had a ton of mishaps like that and now that it’s all done you would never notice them.
Full Video Tutorial:
And that’s it! I’m SO happy with how this project turned out. It definitely took some time to complete, but the amount of money we saved going this route made it so worth it. Another great perk of this paint is that it rinses off very easily with the spray nozzle on the hose, so it’s a very low maintenance floor!


Shop the Post:


Disclosure: We only recommend products we use ourselves and all opinions expressed here are our own. This post may contain affiliate links that at no additional cost to you, we may earn a small commission. Thanks!