DIY Built-In Bookcase IKEA Hack
Everyone loves a good IKEA hack, and I’ve truly been so excited to share this DIY IKEA Billy bookcase hack since the day I started the project. Kate here, and today I’m finally sharing the full step-by-step process I followed to create my studio office built-in bookshelves!
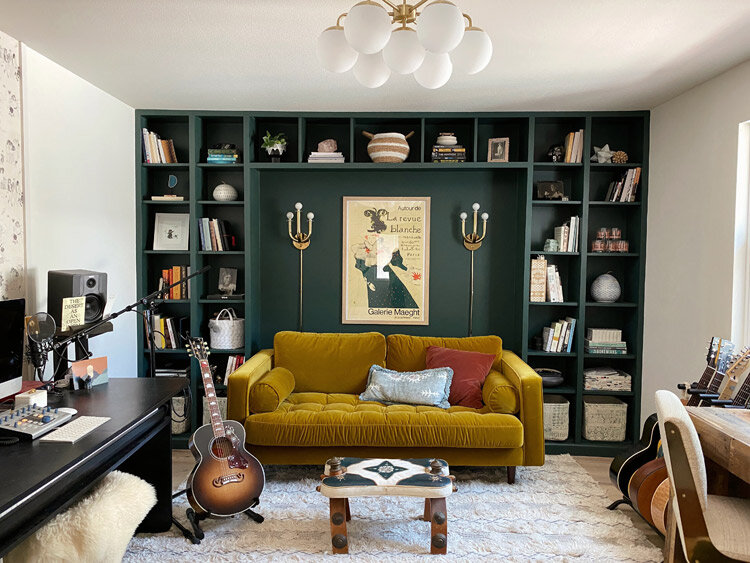
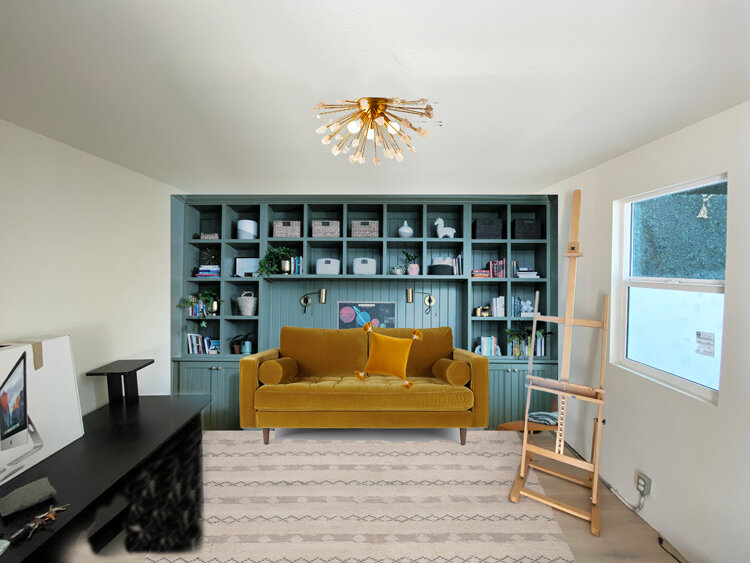
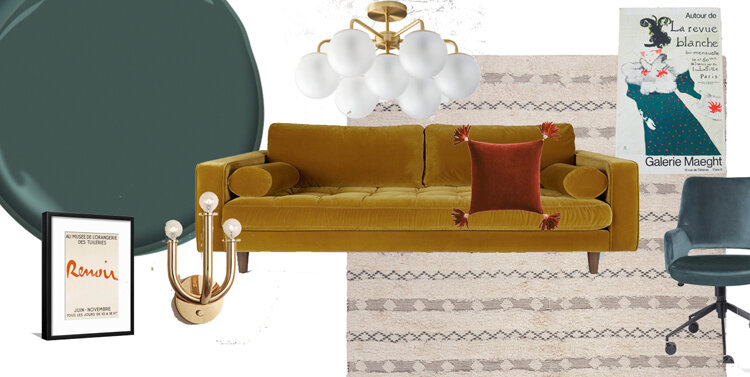
When we moved in, this room off the garage was pretty much a plain box and a blank canvas. This separate space was a huge selling point for us in this house, because my ultimate goal has always been to have a standalone music studio and office. I knew there was a ton of potential here, and after pinning a ton of photos of built-in bookshelves I knew they would be the perfect focal point for my office.
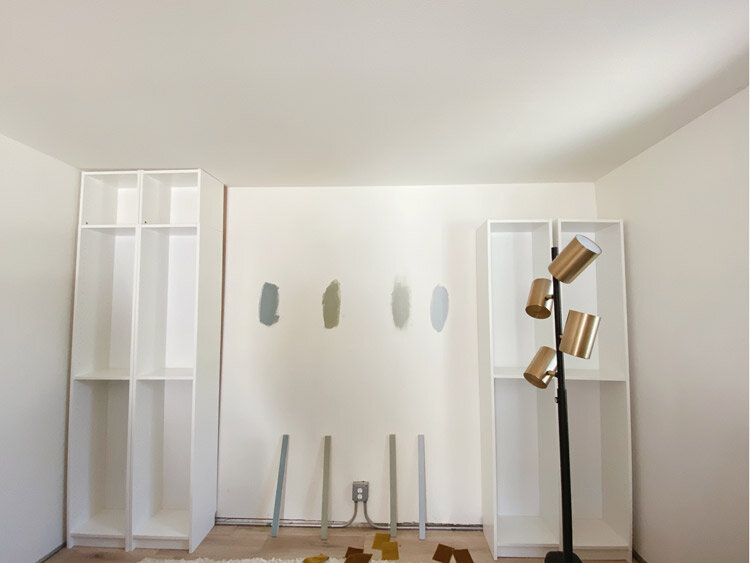
Here’s what the space looked like before:

If you’ve ever looked into custom cabinetry or shelves, you know that hiring someone to create them from scratch can be outrageously expensive. Because I was already decorating on a budget I decided to DIY my built-ins with IKEA Billy bookcases, and luckily the internet is full of awesome resources from DIYers who have used these versatile and affordable shelves in their projects.
The Design Process
While IKEA carries a lot of styles of bookshelves that would work great for a built-in hack project, I decided on the Billy for a few reasons. It just so happened that the size I chose - the 15 3/4” wide x 93 1/4 " tall shelves - was almost exactly the perfect height for my office ceiling. My ceilings are slightly less than 8 feet high, so if you have 8 foot ceilings this size should be a perfect fit for you too.
I also knew I wanted to put a 72” sofa between the shelves, and oddly enough my room measurements worked out so that two of the 15 3/4” shelves would fit almost perfectly on either side of the sofa. Even though I wish the shelves themselves were a bit deeper (they’re only about 10” deep), this coincidence of measurements was far too good to pass up.
All my inspiration photos had one thing in common, and that was connecting shelves in the middle between the vertical shelves and above the sofa . I think something about this design element really seals the deal in terms of making shelves look truly built-in.
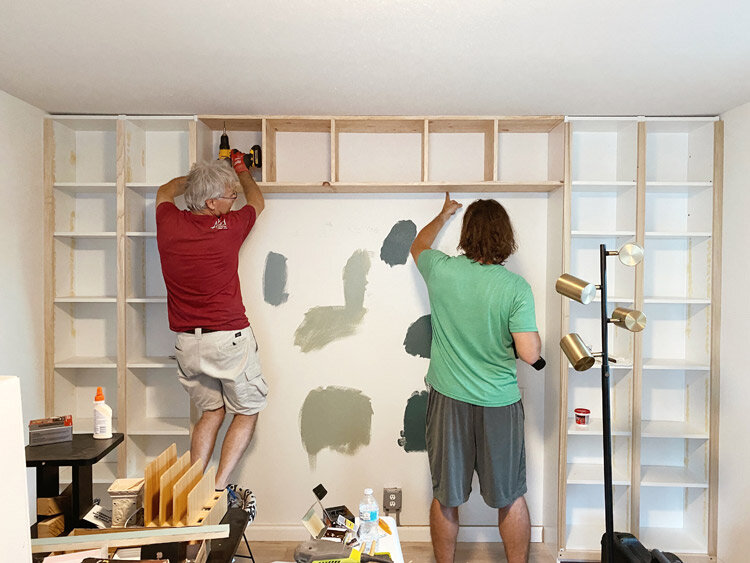
Since IKEA doesn’t make any horizontal Billy products that would work to fill in the middle, we had to create that shelf from scratch.
Here are some inspiration boards I mocked up in Photoshop:
Here’s a step-by-step breakdown of the whole project:
DIY Built-In Bookcase IKEA Hack
I relied heavily on this very thorough DIY post that uses the same Billy bookshelf style from A Beautiful Mess. We approached the project differently in several ways, but it’s a great additional resource if you decide to take on a project like this!
Tools
Circular Saw or Jig Saw
Miter Saw (to cut mitered angles for Baseboard, if using)
Drill and assorted drill bits
Tape Measure
Nail gun (I have this one)
Electric Sander and sandpaper (I like this one because it’s not too heavy for me)
Materials
4, 15 3/4” IKEA Billy bookcases
3, 1-in x 12-in x 8-ft Whitewood Board for the middle shelf
10, 1-in x 2-in x 8 ft poplar boards
1, 9/16 in x 3 1/4 in. x 96 in Baseboard
Assorted wood screws
Caulk
Shellac-based primer (I used this one - it’s super important to use shellac-based because of the finish on the IKEA Billy bookcases)
Paint (I used Hidden Falls by Benjamin Moore in Satin on the shelves, and in Matte on the wall behind)
Instructions
1. Build your Billy bookshelves according to the instructions provided, only adding the fixed middle shelf and skipping the adjustable shelves for now.
2. Decide where you will ultimately want the adjustable shelves to live by playing around with different placement. The Billy is designed in such a way that doesn’t allow for every cubby to be the exact same size, so determining what you want the placement to look like in advance is crucial before committing to filling in the adjustable shelf holes.
3. Line your bookcases up and make sure they fit correctly - my office has VERY uneven floors, and it turned out that the floors on the right side of the bookshelf wall were higher than on the left, meaning we had to cut down the top shelf extenders for the two right Billys a bit in order for them to fit.
4. Secure your Billy bookcases to the wall, making sure to drill them into the studs at as many locations as possible. Because the back panel of Billy bookcases is not a solid wood material, we drilled the outermost bookcases to the walls perpendicular to the sofa wall vs. drilling through the back of the bookcases. We then drilled the inner bookcases to the outer bookcases so everything was attached.
5. If adding the middle shelf portion, measure out the length between the two pairs of Billy shelves and cut two of the 1 x 12 x 8 ft Whitewood boards to that length using a circular saw, miter saw, or jig saw. I wanted this middle shelf portion to be flush with the Billys in front, so we also cut them down a bit lengthwise so they would line up with the front edge of the Billys. I also wanted the middle shelf portion to be the same height as my top Billy shelves, so I determined what height my vertical cubby panels would need to be in order to place the top and bottom panels in line with the top Billy shelf and cut four Whitewood board panels to that size.
5. Assemble your middle shelf portion as its own entity. Because the 72” space between my Billy pairs wouldn’t allow for equally sized cubbies that matched the top cubby of my Billys, I decided to create two matching sized cubbies on the ends of my middle shelf and leave a larger cubby in the middle for a nice symmetrical look. After deciding on cubby size and placement, drill your vertical panels in place between the two horizontal Whitewood boards.
6. Attach your middle shelf portion to the Billys (definitely a job for at least two people) by drilling the upper horizontal panel into the ceiling studs in several places. There was no easy way to secure the middle shelf portion to the Billys themselves, so we simply made sure we secured it to as many ceiling studs as possible in several places.
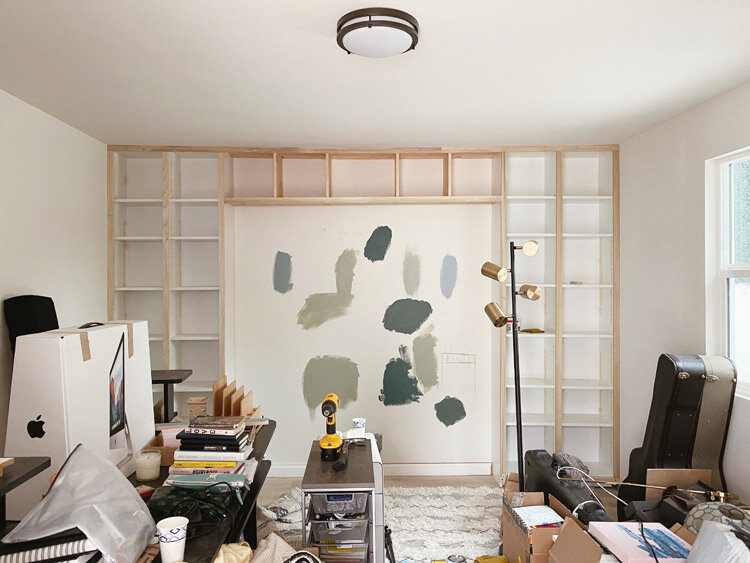
7. Add your poplar boards. In order to address the small gaps between the outermost Billys and the adjacent walls, plus the small gap between the top of the Billys and the ceiling and to create a smooth line across the top and further blend the Billys with the middle shelf portion, we used the 1” x 2” x 8 foot poplar boards to give a uniform look. We also ran them vertically between the pairs of Billy bookcases to cover the seam between them, and the 2” thickness covers the seam perfectly. We also added a poplar board to the bottom of the middle shelf portion.
To further the uniform look, we ran the poplar boards on the outer edges of the Billy pairs as well, and although the outer vertical panels on the Billys are not as thick as the 2” poplar boards, we just lined up the outer edges of the poplar to be flush with the wall and sides of the bookcase and it worked really well. **We decided not to run poplar vertically over the interior vertical panels of the middle shelf portion, because the existing thickness of the Whitewood already matched the thickness of the horizontal shelves on the Billys.** Use a saw to cut the boards to the necessary sizes, then use a nail gun to secure the boards in place.

8. Connect the bottoms of the Billy shelves. I had to get a bit creative to get the look I was going for on the bottom, and I ended up attaching a poplar board just below the bottom shelf on each Billy pair, then layering baseboard over top to finish out the bottoms.
9. Fill in the adjustable shelf holes, any screw holes from drilling, and nail gun holes with wood filler. This is kind of a pain, but in my opinion it’s one of the things that makes this project look truly built-in. Let dry according to product instructions, then sand for a smooth finish.

10. Sand, sand, sand. DO NOT skip this step. It’s a pain and it takes forever to sand each cubby, but I promise it’s one of the most important steps to make sure that the primer bonds with the Billy bookcases. I used this sander because it was light and easy for me to maneuver into corners, and also would recommend wearing face protection / goggles to avoid getting dust in your eyes and mouth. After sanding the whole setup, wipe down all surfaces with a damp cloth followed by a dry cloth to make sure all the sand particles are gone.
11. Caulk any gaps or cracks. I went kind of crazy and caulked just about everything I possibly could to make the shelves look as custom as possible. Plus, something about caulking cracks is surprisingly satisfying and anxiety-soothing for me, lol.
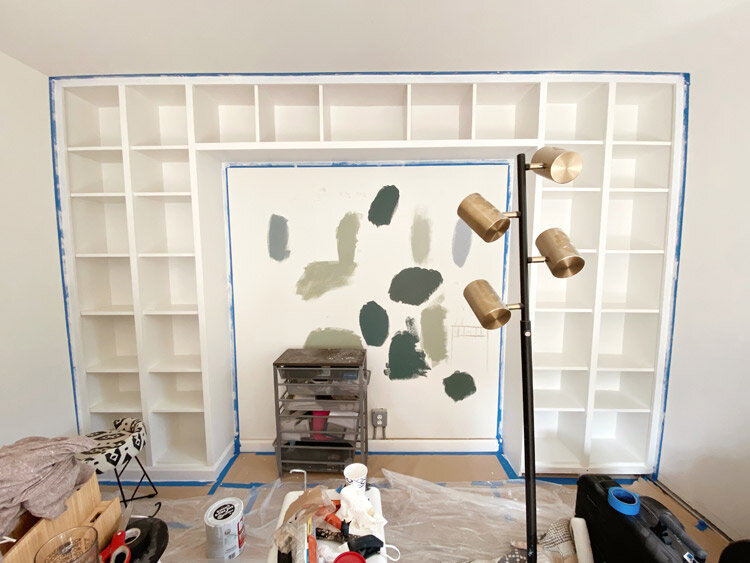
12. Prime your shelves with a shellac-based primer. The DIY I referenced for this project stressed the importance of Shellac-based primer over and over, and I’m glad they did. The finish that IKEA uses on the Billy bookshelves is very difficult to paint if you don’t sand and prime with shellac-based primer, so I did 3 coats of primer (allowing required drying time as indicated on the product label in between coats) in order to ensure my paint job would have the best chance of staying power. Tip: If you have windows in the room definitely open them while you prime. I wore a mask while priming as well because it’s some pretty heavy duty stuff with a strong chemical smell.
13. Paint! I decided to paint the wall behind my shelves first with a Matte finish, then used the Satin finish to paint the Billys and the middle shelf portion. I ultimately ended up doing two full coats of paint on both the wall and the shelves, with touch ups after the fact in any spots that needed it. Make SURE you wait the recommended amount of time between paint coats so as to allow them to properly dry.
I used Benjamin Moore brand, and after my final coat of paint I waited a full 7 days before putting anything on my shelves. To be honest though, I would strongly recommend waiting a bit longer if you can. It’s inevitable that a DIY project like this is going to need touch-ups now and then, but one thing that has helped a lot is putting felt feet or felt squares underneath items on my shelves to avoid anything sticking to the paint and peeling it off.

Once you’ve waited at least 7-14 days, you can start adding all your pretty stuff onto the shelves and style it out!
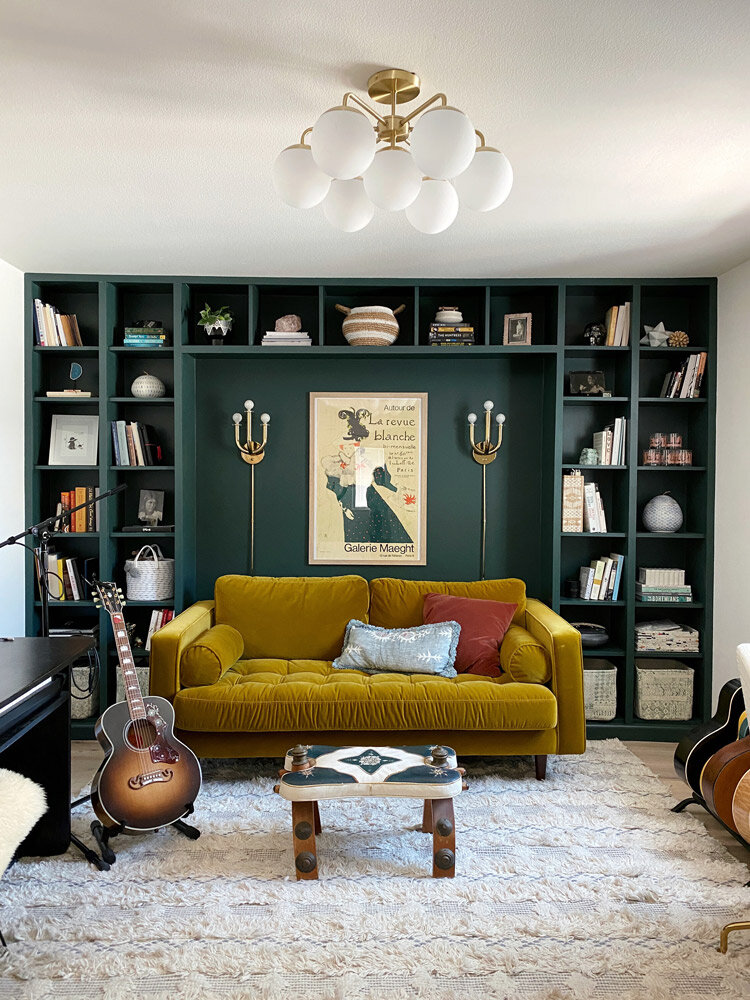
I slid my sofa (the 72” Article Sven in Yarrow Gold) between the shelves, then chose to add one large piece of art (a vintage lithograph of a French gallery show ad) in the center of the wall between the shelves, plus two Jonathan Adler sconces on either side.
I also changed out the boring flush mount light in the room with this mid-century one from CB2 and I love how it finishes out the room!


Have you ever created faux built-in bookshelves from standalone bookcases? What IKEA hack should I try next??

Disclosure: We only recommend products we use ourselves and all opinions expressed here are our own. This post may contain affiliate links that at no additional cost to you, we may earn a small commission. Thanks!